Testing MeshyAI for Jewelry Parts: A First Workflow Experiment
I was recently asked whether I had ever tried using MeshyAI to create jewelry parts.
At the time, I had not.
Rather than simply answering the question, I decided to test it and document the process. This example represents my first experiment using MeshyAI-generated geometry as a starting point for jewelry development.
The goal was simple:
Can AI-generated mesh components become usable jewelry parts within a traditional CAD workflow?
This project demonstrates one approach.
MeshyAI generated the foundation.
The design decisions, refinement, and jewelry construction happened afterward.
Step 1: Start With a Permissible Image — Or Draw Your Own
This is extremely important.
Do not assume images found online are automatically safe to use.
Jewelry photographs may be publicly visible while still representing protected designs. Even when a photo itself is available to use, the jewelry design may remain copyrighted, trademarked, patented, or otherwise protected.
Before using any reference material:
Verify licensing permissions
Confirm commercial use allowances if applicable
Avoid trademarked or proprietary designs
Research whether the jewelry design itself is protected
Obtain permission if needed
Even better — create your own drawings.
Sketches, vectors, ornamental artwork, and original concepts often provide the greatest creative freedom.
Good places to locate decorative reference material include:
Pixabay – decorative vectors and ornamental artwork
https://pixabay.com/
OpenClipart – public domain vector artwork
https://openclipart.org/
SVG Repo – SVG graphics and ornamental elements
https://www.svgrepo.com/
Rawpixel Public Domain Collection – vintage decorative artwork
https://www.rawpixel.com/category/53/public-domain
Smithsonian Open Access – historical decorative references
https://www.si.edu/openaccess
The Met Open Access Collection – public domain ornament inspiration
https://www.metmuseum.org/art/collection
Decorative vectors, scrollwork, filigree concepts, and your own drawings are often safer starting points than photographs of existing jewelry.
For this test, I used permissible reference material specifically to explore how MeshyAI could contribute to jewelry part creation.
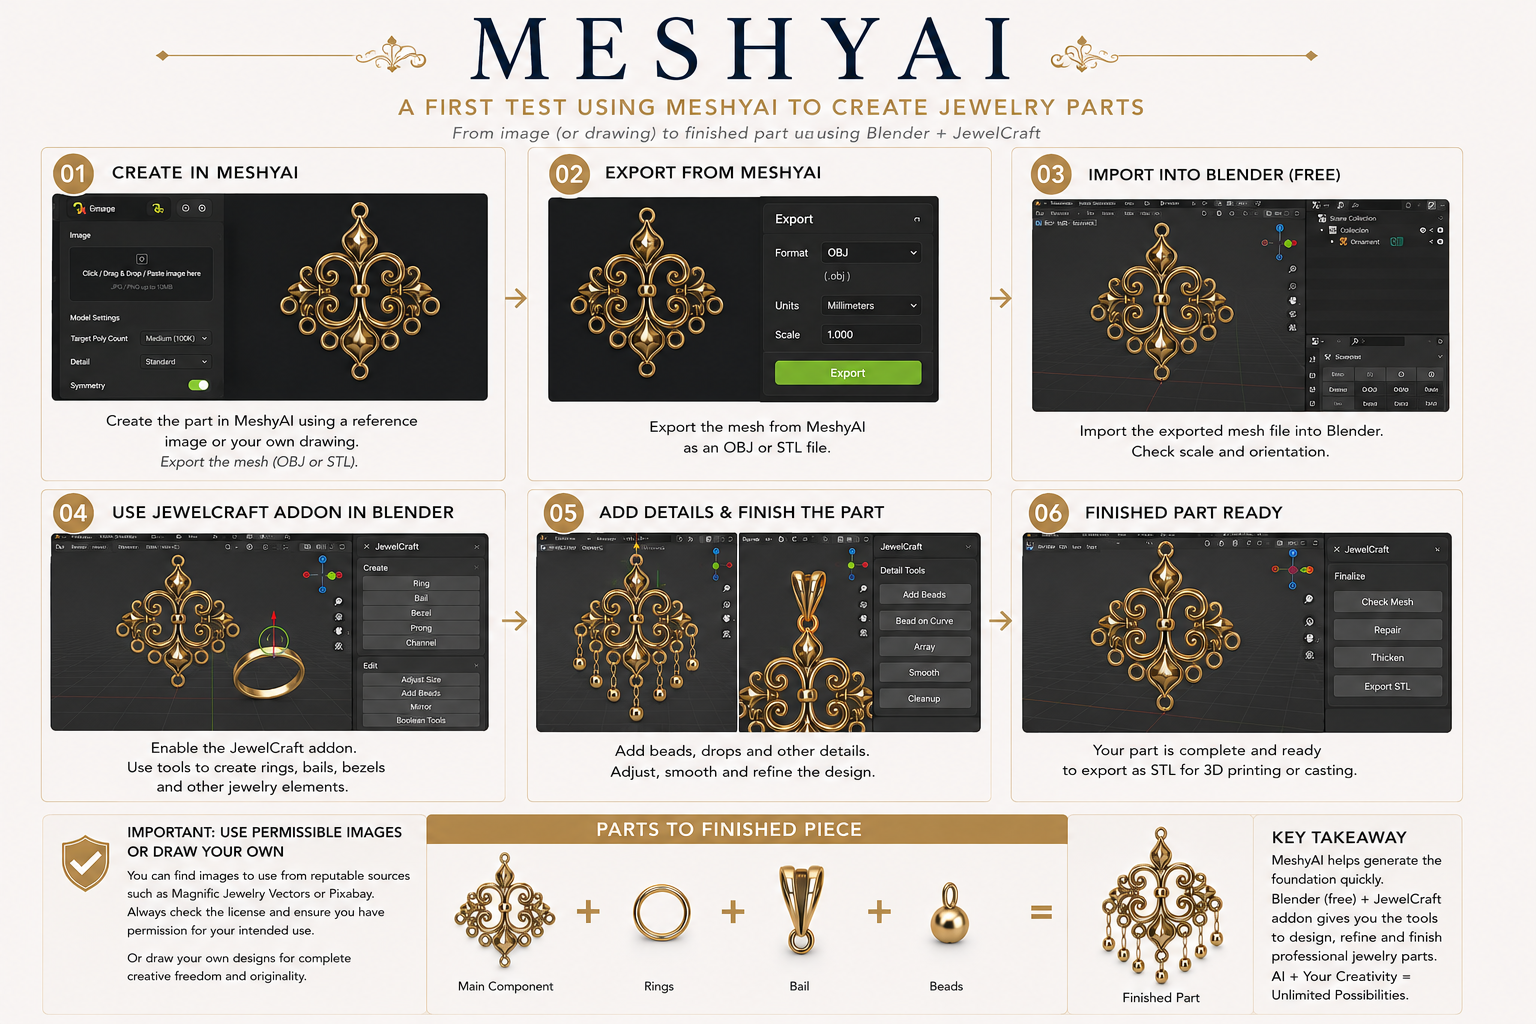
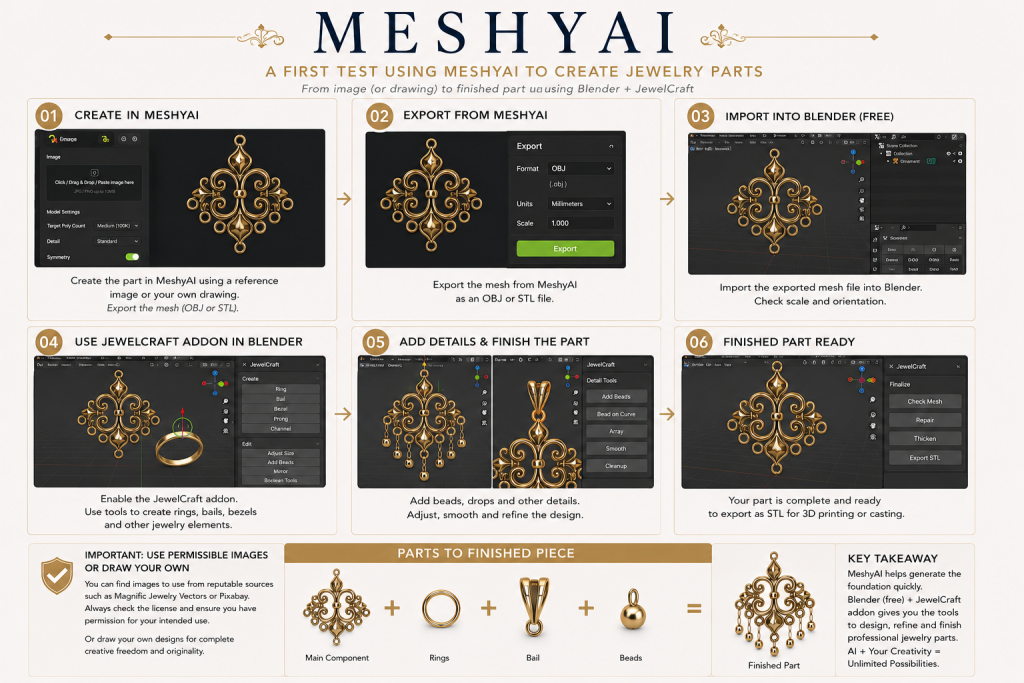
Step 2: Create the Base Component in MeshyAI
The reference image was brought into MeshyAI to generate an initial mesh component.
The generated mesh was not treated as the finished jewelry piece.
It became a foundation.
Think of AI output as raw material rather than a completed design.
The goal is not to replace jewelry craftsmanship.
The goal is to accelerate part creation.
Step 3: Export From MeshyAI
After generating the mesh component, export the model from MeshyAI.
Typical export formats include:
OBJ
STL
The exported mesh becomes your starting geometry for finishing.
Step 4: Import Into Blender
Blender is free and provides an excellent environment for cleanup and preparation.
Import the exported MeshyAI file into Blender.
At this stage you can:
Verify scale
Check orientation
Clean geometry if needed
Position components
Prepare the piece for jewelry refinement
Step 5: Finish Using JewelCraft or Your Software of Choice
I personally use Rhino and RhinoGold, but professional jewelry software can cost thousands of dollars.
Blender provides a strong alternative.
The JewelCraft addon for Blender adds jewelry-focused tools that can help complete a piece.
Typical finishing steps include:
Add jump rings
Add bezels
Add bails
Add bead drops
Refine decorative elements
Adjust proportions
Clean geometry
Prepare for manufacturing or printing
The screenshots shown document portions of that workflow:
Initial MeshyAI generation
Ring creation
Bead placement
Bail creation
Final assembly
What I Learned
This was my first experiment using MeshyAI specifically for jewelry parts.
My takeaway:
AI can create useful foundations.
The craftsmanship still happens afterward.
Jewelry CAD remains about:
Design judgment
Engineering decisions
Proportion refinement
Manufacturing awareness
Artistic direction
MeshyAI provided the starting point.
The finishing software completed the process.
AI did not replace jewelry design.
It became another tool in the toolbox.
This example demonstrates one possible workflow for artists and jewelry designers curious about combining AI-generated geometry with traditional jewelry CAD techniques.